Admin Guide
If you can see this page then you are an admin user - this is the highest level of access and as such you are able to do pretty much anything. The site is fairly simple to understand once you get the hang of it, but there are a few really useful things to know, which are explained in these few pages


Chrome Extension
What is it?
The chrome extension makes it easier for country teams to imput frequently-inserted metadata by doing it for them uses a set of pre-defined templates.
For a video guide, which shows how to install the extension and how to use it, please see below:
How does it work?
This works by creating a set of templates in a web script language called JavaScript. These templates tell the web browser what information it needs to insert into which boxes. When the JavaScript code is called (or run), the text boxes are completed automatically.
The code itself can only enter details into specific boxes and as such doesn't contain any malicious code. Furthermore as we created the extension ourselves, we can be sure of it's content.
How can it be updated?
Updating the code itself requires two steps. The first is to change the list of templates so a new template is in the list, and the second is to create the template.
The files required for this can be found by following the "Useful Resources" link above.
Once you extract the folder you will see several files within it, but the only two you need to familarise yourself with are:
popup.html - this is thew file that contains the list of templates available
popup.js - this is the file that contains the templates
Open these files in a script editor (such as Notepad++) or alternatively, just notepad (available on all windows computers) will work.
1. Adding the new template to popup.html list
(This is only needed if you are adding a new template, if you are editing an existing one, please skip to step 2)
Open the file and you should see lots of code, but within it is something like this (it may be slightly different):
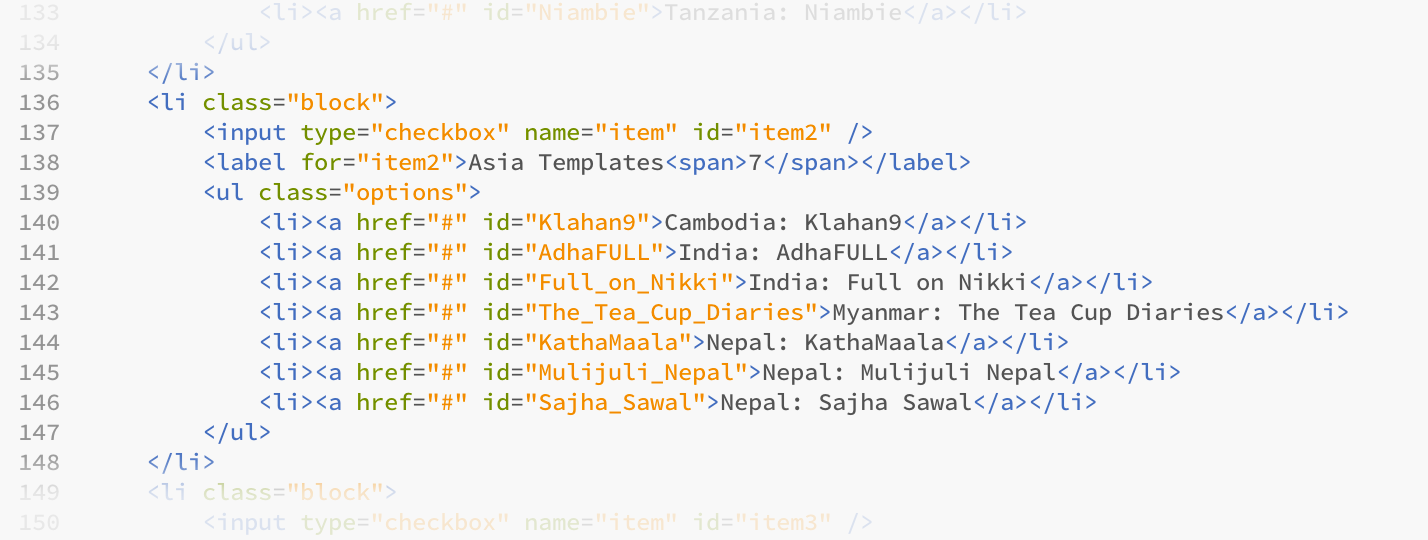
This describes all of the different templates that we have for Asia (there is a section of code that looks like this for every reason).
To add a new template, first change the number next to "Asia Templates" from a "7" to an "8" (as the number of templates listed will increase by 1).
Then copy one of the lines of code and enter your own in exactly the same format, as below:
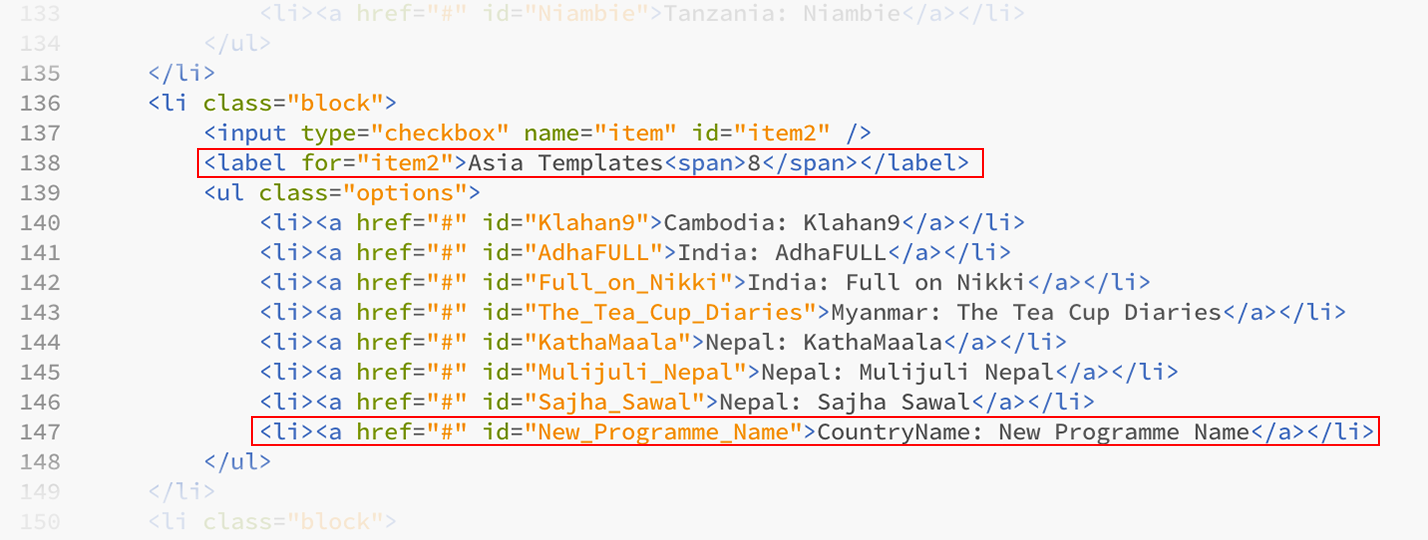
And that's it for adding a new template to the list. The only points to note are that a) whatever you write in the id="" section doesn't matter as long as you remember it (you'll need it in the next section) and it makes sense, and b) it's best to put the templates in alphabetical order bu country so it's easier for end-users to find.
Once that's all done, just save the document.
2. Defining the new template in popup.js
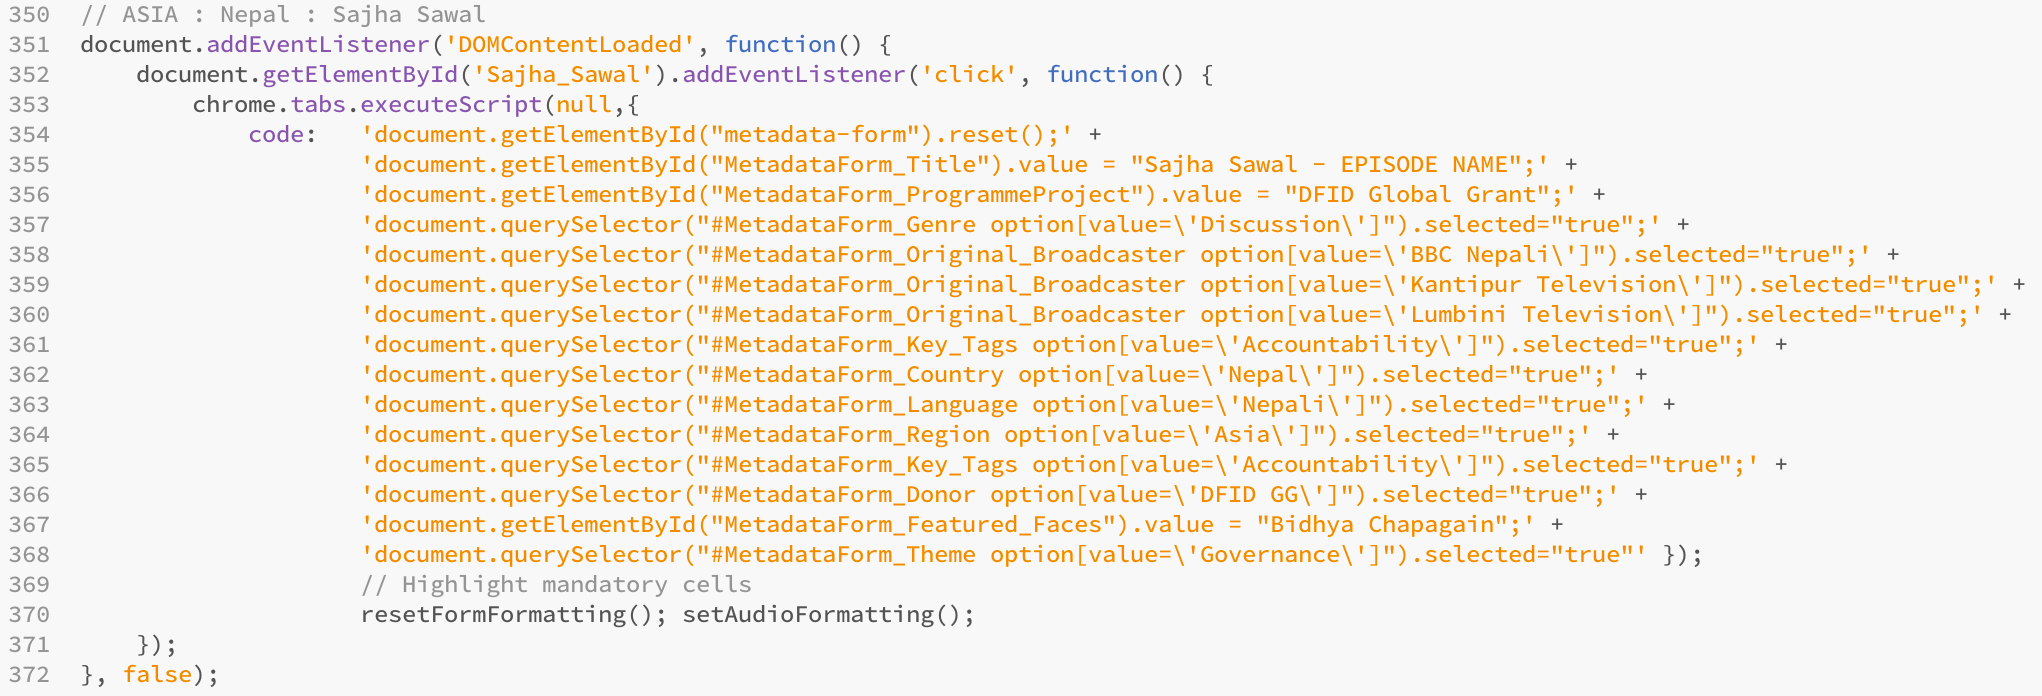
If you open the popup.js document you will see a lot of code. To explain what this does, let's take the "Sajha Sawal" template as an example.
The full template, which tells the web browser what to enter into which boxes, is shown below:
To break this down a little, there are only two sections you will ever have to edit yourself if you want to create, or edit a template (if you are creating a new one, just find the Sajha Sawal template in the document, copy it, and paste it beneath it).
The first is at the very top and it tells us what the teplate is for:

The first line // ASIA : Nepal : Sajha Sawal is purely for our own benefit. This is so that when we look through the teplates we can find what we're looking for. Indeed any line that begins with "//" will not be read by the browser as it declares that anything on that line is just a note for the programmer. So just make sure you have something in here that makes sense (follow the naming convension above for simplicity).
Then the only other thing to change here is the section that begins document.getElementByID('Sajha_Sawal') - repmember that id that we created in the previous step and highlighted was important to remember? well this is where it goes, just replace Sajha_Sawal with the new id. This means that when the user clicks on the template list, the web browser knows which template to execute (it's "listening" for that keyword").
After the declaraiton is a series of statements that tell the browser what text to input, and in which boxes to input it. There are two different kinds of statement, which look as follows:
![]()
Before we go any further, it's important to point out that there are two types of input when a user tries to create a record. They can either enter text into a box, or they select a value from a list. These two different lines of code refer to those two different types of input.
The first statement inserts a text value into a text box. The opening part document.getElementById tells the browser to find a textbox and it then says what the name of the textbox is - in this example it's "MetadataForm_ProgrammeProject". It's not a catchy name, but it's clear that it refers to the box that holds the name of the Programme or Project. Finally the line of code tells the browser the value it wants to insert into the box, and in this example it's "DFID Global Grant".
The second line refers to a value that has to be selected from a dropdown list. The opening part document.querySelector tells the browser to find the dropdown list and then it gives it the name of the list #MetadataForm_Genre. The next part of the line tells the browser which option to select, in this case the programme genre is a disussion, so the code is option[value=\'Discussion\']. It is possible to select more than one option in a dropdown box, and to do this just repeat the line of code again but this time pick a different value instead of "Discussion" as used in this example.
3. Installing and testing the new template
To install and text the template, save all of the files locally and then open Google Chrome.
If you have already got the extension installed and you saved the files you've edited into the original folder, open chrome, type "chrome://extensions/" into the address bar, hit enter, find the extension in the list and press "Reload Extension".
Otherwise if you haven't got it installed correctly:
- Once Chrome is open, type "chrome://extensions/" into the address bar and hit enter
- Tick the checkbox at the top of the page called "Developer mode"
- Click "Load unpacked Extension"
- Find the folder you've saved, and then click "select"
Then open the archive and test out the extension. If it works, great. If it doesn't, go back and check your code. Compare it to other templates and see if you can spot any diffetences (often missing punctuation like ;,/'" can be to blame).
Further Reading
The code used to create this template is commonly found in pretty much any website you ever use.
If you would like to learn more about the languages used, there are three great resources below:
HTML - this is the language that tells the browser what to display, and is a key component in all websites today: https://www.w3schools.com/html/default.asp
CSS - this tells the web browser how to present the data given to it by the HTML code. For example, the HTML code could say to insert the words "HELLO WORLD" on the page, but CSS defines how to diplay it (what size, colour, position on a page, etc...). This language is not as old as HTML but it is just as important and revolutionised the way websites are made: https://www.w3schools.com/css/default.asp
JavaScript - unlike the above languages, this is a dynamic language in that is can change what is happening to the page as and when you ask it to (the above languages can only update when you refresh a page). JavaScript therefore is used to update the page without you refreshing it - it is thanks to JavaScript that when you are on Facebook you receive a notification without refreshing. It is this code that inserts the template onto our form, and you can learn more about it here: https://www.w3schools.com/js/default.asp